Baby Shower Dessert Table

June 8th, 2015

It seems forever ago now, but I still wanted to share my baby shower photos with everyone. My family went to such a great effort to make my baby shower dessert table… and yes, even though it was my baby shower I just had to make some cakes! This was my chance to decorate a couple of cakes, using the ruffle icing technique, my new fondness of sugar flowers and some sugar baby related decorations.

First up, I made a chocolate Guinness cake (in advance, and froze the cake). On the day I decorated it with cream cheese frosting ruffles! and the first peony I managed to make at home, in a beautiful coral colour (I’m loving everything coral!)
Here are two great tutorials on how to create the ruffle cake:
tutorial 1
tutorial 2

Next up, this was as close to decorating in fondant that I get (coming from a family who doesn’t really enjoy fondant that much). I made the baby carriages and horses out of sugar paste in advance, and stuck them on the Vienna cream icing. Unfortunately they became quite soft reasonably soon after being placed on the cake. I ordered my cookie cutters from here.

Mum’s lovely almond butter biscuits, easy to make the day before.

Cupcakes and tiny teddies decorated with pink and blue mm’s.

Caramel slice, chocolate mousse and red velvet cupcakes.

Armenian nutmeg cake and chocolate brownies.


Balsamic onion, pear and walnut pizza

June 5th, 2015

Balsamic Onion, Pear and Walnut Pizza

I have recently been going through my dozens (and dozens) of food magazines. Unfortunately i just don’t have the room to keep them all, and even if I did, once they get stored away, I don’t look at them. I’ve torn out hundreds of recipes I’d like to try and (sort of) ordered them into different categories. The plan for a while, was to cook at least 2 new recipes per week, although I found I kept losing some of my favourite recipes. This pizza is one of those new favourites.

Balsamic Onion, Pear and Walnut Pizza

It’s a very easy pizza to make (you can make the caramelised onion in advance, and make the bases if you like – or buy them). It is a wonderful combination of flavours and is lovely and sweet. A great pizza to make for a change to the more common toppings.

Balsamic Onion, Pear and Walnut Pizza

Balsamic onion, pear and walnut pizza

Recipe from delicious magazine, also available on Taste
Serves: 4

2 tbs olive oil
2 red onions, thinly sliced
1/4 cup (60ml) caramelised balsamic vinegar (bought or homemade)
1/4 cup (65g) store-bought pesto
1 Afghan bread or 2 thin based homemade pizzas
2 beurre bosc pears, peeled, cored, sliced, brushed with lemon juice
150g mozzarella, sliced
1/4 cup (25g) walnuts, toasted, chopped
Handful wild rocket leaves

Place a baking tray in the oven and preheat the oven to 220C.

Heat oil in a frypan over medium-low heat. Add the onion and a pinch of salt, then cook, stirring, for 10-20 minutes until softened and caramelised. Add 2 tbs vinegar and cook for a further 1 minute. Set aside.

Spread the pesto over the bread (or pizza base), then scatter with the balsamic onion and top with pear and cheese. Place on the hot baking tray and bake for 10 minutes or until the base is crisp and the cheese is golden. Remove from oven and sprinkle with the walnuts and rocket. Drizzle with the remaining 1 tbs vinegar, then serve

Balsamic Onion, Pear and Walnut Pizza

Balsamic Onion, Pear and Walnut Pizza

Balsamic Onion, Pear and Walnut Pizza

Balsamic Onion, Pear and Walnut Pizza

Balsamic Onion, Pear and Walnut Pizza


Pink Sugar Roses

June 3rd, 2015

I have a lot of hobbies (some may call them obsessions). Food, flowers, photography. What’s great about these hobbies, is that they go so well together. I do seem to add and add and add though, rather than replace. One of my most recent hobbies has been sugar flowers. I’m not sure where the obsession started… although I think it was possibly viewing one of the many gorgeous posts from Bake in Paris. Such a beautiful job with all the sugar flowers, how could one not be in awe!

This led me to join a community college course in cake decorating, in which I learned many valuable techniques, although it only touched on sugar flowers, and not enough for what I wanted to achieve. I later went to a 2 day course at Planet Cake and learned how to make a peony and hydrangea arrangement. I bought a book and pinned lots of tutorials, although have only just started to play and learn.

I made these roses and white flowers using gumpaste which just did not handle well (this was the second time I had tried making gumpaste, each from a different recipe). Although I was very happy with the results, especially compared to my first ever rose I tried to make (I found patience was the key here, originally I tried to make the whole rose in one day – it just doesn’t work, you need to let the paste dry and harden inbetween layers).

This cake was a poppyseed cake, with orange frosting (as fondant isn’t enjoyed by my family). A lovely, yummy cake chosen by my Mum, as this was a special cake for her birthday weekend for a very special birthday.

I look forward to continuing to explore my passion for sugar flowers (and cake decorating) and will hopefully make some tutorials when I am happier with my results.


Ferrero Rocher Cake

January 18th, 2015

Ferrero Rocher Cake

We had an amazing cake tonight to celebrate my sisters birthday. It is called a Ferrero Rocher Cake, and it certainly captured the lovely flavours of one of my favourite chocolates.

Ferrero Rocher Cake

The cake was a lovely hazelnut sponge, light and fluffy and not too rich, with layers of hazelnut chocolate cream/icing and wafers. It was decorated with Ferrero Rochers and wafers (hazelnuts on the outside would have also worked very well, although the heat was affecting the icing and time was running out for us, so we decided against using the hazelnuts).

Ferrero Rocher Cake

We made the cake the day before, and had a bit of a failed attempt on our first batch, as the eggs were not beaten for long enough – causing the mixture to split and not rise. The second attempt, we used the whisk attachment and whisked it for a long time and it worked very well.

Ferrero Rocher Cake

We kept the cake in the fridge after decorating, which helped reduce some of the sweetness. I’m not sure how long you could keep it in the fridge before it affects the crunchiness of the wafers. I would definitely make this again.

Ferrero Rocher Cake

Ferrero Rocher Cake

Recipe from Let the Baking Begin

Cake Layers

7 large eggs, room temperature
½ cups sugar, granulated
2 cups finely ground hazelnuts or hazelnut flour
3 Tbsp all purpose flour
3 Tbsp cocoa powder
3 tsp baking powder

Frosting

300 grams unsalted butter, room temperature
2¼ cups (360g) chopped chocolate or chocolate chips
½ cup (120g) Nutella

Also

1.5 cup (40g approx) wafers, crushed

Decorating

10 Ferrero Rocher Candies
¾ cups hazelnuts, chopped / or ¾ cups wafers, crushed

Instructions
Cake Layers

Preheat oven to 180C. Grease and line 2 x 20cm round pans with baking paper.
Sift flour, cocoa & baking powder. Stir in ground nuts.
Whip eggs on high speed (in a stand mixer with whisk attachment), until frothy. Slowly add the sugar and continue whipping until tripled in volume, about 5 minutes.
Fold dry ingredients into the eggs , in 3 additions.
Divide the batter evenly between 2 x 20cm pans and bake at 180C for approximately 20-30minutes, turning half way, until a toothpick inserted in the center comes out clean.
Once baked, leave in the pan for 5 minutes, then transfer to a cooling rack.

Make the Frosting

Melt chocolate in microwave, on low heat, in short intervals, stirring each between each time. Bring to room temperature.
Whip chocolate, butter & Nutella until thoroughly combined. (I used a stand mixer with beater attachment)

Assembly

Once the cake is cool, split each cake in 2 even layers.
Crush wafers by putting in a ziplock bag, then going over them with a rolling pin or something heavy.
Reserve ¾ cup frosting for decorating.
Place a dab of frosting onto a serving platter.
Put 1 cake layer on top and press to adhere.
Put ¼ of the remaining frosting onto the cake and spread around evenly. Sprinkle with ⅓ of the crushed wafers.
Repeat above 2 steps with the remaining cake layers.

Ferrero Rocher Cake
Ferrero Rocher Cake
Ferrero Rocher Cake

Pipe 8 stars on top of the cake.
Cover the cake sides with reserved frosting.
Press the crushed wafers or chopped hazelnuts onto the sides of the cake.
Place 1 Ferrero Rocher candy on top of each piped star.

Notes
Keep refrigerated if not serving right away. Bring to room temperature before serving.


Malteser Cake

January 11th, 2015

Malteser Cake

After seeing a cake covered in maltesers, how could you NOT make it? And what better excuse than a birthday.

It looked lovely and tasted lovely – only very very rich. I couldn’t get through my piece, and neither could a number of other family members. The cake was rich and the icing, very sweet and there was lots of it.

I would definitely consider decorating another cake in maltesers, as it looks lovely – and I love maltesers…. but I wouldn’t make this recipe again unfortunately. Just too rich for me and my family.

If you would like to try it, I used this recipe from Taste.


Pražský koláč (Prague Kolache) – Daring Bakers Challenge September 2014

September 27th, 2014

Kolache

The September Daring Bakers’ challenge was brought to us by Lucie from ChezLucie. She challenged us to make a true Czech treat –Kolaches!

The challenge this month looked like lots of fun. (I missed out on last months challenge, but hope to make it up soon). A bready-cake topped with a crunchy cinnamon topping and filled with custard was highly likely to taste great.

Kolache07

All components were quite easy, although I was a little concerned when my cake didn’t rise much in either of the resting periods. It all turned out in the end and was so lovely, after eating our first slice, Nick and I went back for a second slice. This probably wasn’t the best idea, as it was a little rich as the custard wasn’t very cold.

There was a little bit of cake left over the next day, and it was devoured very quickly. The topping stayed surprisingly crunchy and everything was still lovely. I do enjoy trying new dishes, it’s so much fun!

Kolache09

Pražský koláč (Prague Kolache)

Servings: 8 – 10 (original recipe in metric)

for cake:
1¾ cups (420 ml) (9 oz) (250 gm) all-purpose (plain) flour
½ cup (120 ml) (125 gm) mayonnaise (store-bought or home-made), room temperature
2 tablespoons (30 ml) (1 oz) (30 gm) granulated sugar
1 small egg, room temperature
15 gm (½ oz) fresh yeast or 1 packet (2 teaspoons) (7gm) dry active yeast
5 tablespoons (75 ml) milk, warm
½ teaspoon (3 gm) salt
for cream:
2 cups (500 ml) milk, divided
½ cup (120 ml) (3½ oz) (100 gm) granulated sugar plus 1 tablespoon (½ oz) (15 gm)vanilla sugar
½ cup (120 ml) (2-2/3 oz) (75 gm) vanilla pastry cream powder
1 stick (½ cup) (4 oz) (125 gm) butter, room temperature
5 tablespoons (75 ml) double cream, chilled
for streusel topping:
1/3 cup (1¾ oz) (50 gm) plain flour
¼ cup (60 ml) (1¾ oz) (50 gm) butter, chilled and diced
¼ cup (60 ml) (1¾ oz) (50 gm) caster (or granulated) sugar
½ teaspoon (2 gm) ground cinnamon
for finishing:
1 small egg, lightly beaten

In a bowl of your stand mixer, sift flour and make a hole in the middle. Crumb the yeast into the hole, add 1 teaspoon sugar and about 3 teaspoons warm milk. Mix yeast, sugar and milk with fork and lightly sprinkle the surface with flour. Cover the bowl with towel and let rise for 10-15 minutes.

Kolache01

Add rest ingredients (mayonnaise, sugar, milk, egg and salt) and knead with dough hook on low speed for 10 minutes, until you have smooth dough.

Turn the dough onto a lightly floured surface. Cover with towel or clingfilm and let rise for about an hour to double its volume.

Kolache02

Form the dough into a ball and place it onto the baking sheet lined with parchment paper. With your palms and fingers press the dough and shape it to disc about 20–25 cm (8-10 inch) in diameter and 2–3 cm (¾-1 inch)thick. Let rise for 30 minutes.

Meanwhile preheat your oven to moderate 320°F/160°C/gas mark 3 and make streusel topping. In a medium bowl, mix together sugar, flour and cinnamon. Add cold butter and with your fingers, mix all ingredients until crumbly.

Brush the cake with eggwash and sprinkle with generous amount of streusel topping.

Kolache04

Bake for 20 minutes until golden brown. Let cool on a wire rack.

Kolache05

Prepare the cream.
In a small bowl, mix well ½ cup (125ml) milk with the vanilla pastry cream powder. Set aside. In a saucepan, mix the rest of the milk 1½ cup (375ml) with the sugar and vanilla sugar and bring it to boil, stir occasionally. Add the milk-pasty cream powder mixture and boil for 3 – 5 minutes, stirring constantly.
Transfer the mixture into a bowl of your standing mixer fitted with paddle attachment and let cool completely, while stirring constantly on a low speed. Add diced butter and mix together.
Separately whip the double cream until stiff. Mix with vanilla cream.

Kolache03

Cut cooled cake lengthwise and spread the cream onto the bottom part. Cover with upper part. Cut into 8 to 10 pieces.

Kolache08


Chocolate Hazelnut Mousse Layer Cake

September 25th, 2014

When it came to my sister’s birthday (last year), she had the exact main and cake decided upon, which made planning very easy.

The main was a beautiful slow cooked beef parpadelle, which I will have to make again and post – it is divine! And the cake was this gorgeous chocolate hazelnut mousse layer cake. The cake tasted amazing and worked beautifully with the mousse.

If you’re afraid the cake might taste too much like coffee, don’t worry it didn’t, and I cut down the coffee for the mousse, as I wanted to enjoy it too 🙂 Everyone else had to suffer with the reduced coffee flavour.

Chocolate Cake with Hazelnut Mousse

Recipes from: Erica’s Sweet Tooth

1-3/4 cups all purpose flour
2 cups sugar
3/4 cups good cocoa powder
2 tsp baking soda
1 tsp baking powder
1 teaspoon salt
1 cup buttermilk
1/2 cup vegetable oil
2 large eggs
1 tsp pure vanilla extract
1 cup freshly brewed hot coffee

– Preheat the oven to 350 degrees. Prepare you 8″ cake rounds by greasing and flouring them

– Sift the flour, sugar, cocoa, baking soda, baking powder, and salt together into a bowl and mix until well combined

– In another bowl, combine the buttermilk, oil, eggs, and vanilla. With the mixer on low speed, slowly add the wet ingredients to the dry

– With the mixer still on low, add the coffee and stir just to combine

– Split the batter into the prepared pans

– Bake for 35-40 minutes, or until cake tester comes out clean
– Cool in pans for 30 minutes, then turn onto a cooling rack to cool completely
– Once cooled, use a large serrated knife to evenly split each layer into 2 and level off any domes from baking
– Layer cakes and mousse, sprinkling toasted hazelnuts between each layer for a nice crunch

Chocolate Hazelnut Mousse

3 cups (750ml) whipping cream
1 cup Nutella spread
4 tbsp hot water (not boiling)
4 tsp instant espresso (I used about 1 teaspoon)
Dash of Kahlua

– Dissolve instant espresso in hot water in a medium sized bowl
– Add the Nutella and Kahlua, beating until smooth
– In a mixer, whip the whipping cream until it forms stiff peaks
– Gently fold the nutella mixture into the whipped cream until the color is uniform
– Divide mousse between layers of cake


Banana and Blueberry Mini Muffins

August 28th, 2014

Banana and Blueberry Mini Muffins

When I first decided to make some mini muffins for my bub, I didn’t want to add extra sugar (whatever was already present in fruit would be sweet enough), so I came up with an easy recipe that I am super happy with (as are the bubs and adults who have tried it).

I doubt this recipe would make fantastic normal sized muffins (as I do have a sweet tooth, and find them a little on the low-sweet side), but they are perfect mini muffins.

Banana and Blueberry Mini Muffins

I hope you and your kids or bubs enjoy this recipe.

Banana and Blueberry Mini Muffins

Recipe from Anita @ Leave Room for Dessert
Makes 16 mini muffins

1 banana, mashed
3 Tablespoons vegetable oil (plus a touch extra for the mini muffin pan)
1 egg
1/2 teaspoon vanilla extract (or seeds from half a vanilla pod)
1/2 teaspoon cinnamon powder
1/2 cup (70g) self-raising flour, sifted (you could probably use self raising wholemeal flour)
1/2 cup (70g) blueberries, fresh or frozen, washed

Preheat oven to 170C. Lightly grease 16 holes of a mini muffin tin with a little oil (using a pastry brush).

In a medium bowl, whisk together the egg and oil. Once well mixed, add banana, vanilla and cinnamon and whisk well.
Add self-raising flour and fold through with a spatula, followed by the blueberries. Mix until just incorporated, try not to over-mix.

Spoon the mixture into 16 mini muffin holes and bake for approximately 15 minutes. (check at 5 and 10 minutes to gauge how long they will take). Allow to cool slightly in the tin for a few minutes, then remove and cool on a cooling rack.

Mini muffins are best eaten on the day of making, but can be kept in an airtight container for 2 days, or frozen and allowed to thaw on the day of eating.

Banana and Blueberry Mini Muffins


Choc Top Extraordinaire

August 11th, 2014

Choc Top Extraordinaire
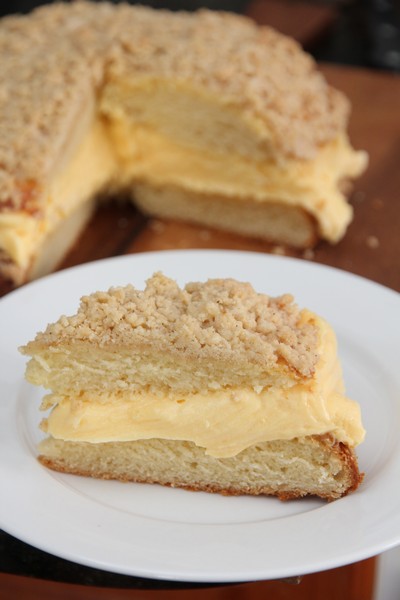
There have been many lovely dessert recipes on MasterChef this year (like most years). Some of the top chefs in Australia share some of their beautiful recipes, some which can be mastered at home, and others which are a bit more difficult to achieve at home (either due to equipment or accessibility to ingredients).

One of the recent recipes was by Nick Palumbo from Messina (an amazing gelato store and one of the best in Sydney), and it was a decadent looking choc-top. Having visited Messina many times to try both their gelato and magnificent desserts from their Creative Department, I knew this dessert was one I wanted to try.

I took two days to make the components (as I needed to organise my time around my bubs naps). The first day I made the almond meal, hazelnut paste, amaretti and gelato base (and left it in the fridge over night before churning), the second day I made the ice cream cones, Italian meringue, ganache and chocolate dip and assembled it.

Choc Top

My first cone didn’t turn out very well (shape-wise), which meant we got to try it! It was lovely and crunchy and a had wonderful flavour. I would love to make them again (even if they were time consuming). I think I may have also taken the caramel a little too far, as I ended up with a slight bitter taste in the gelato (although it still went well with all the other flavours.

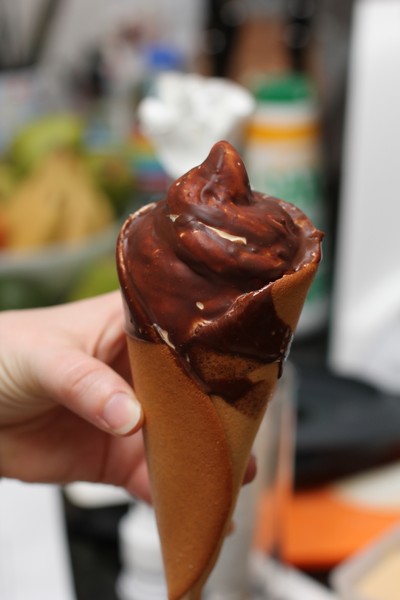
The cone that made it into the pictures, was piped (using a piping bag) and placed in the freezer for a while (maybe 20 mins?) and then dipped into the chocolate, which had cooled a little, but was still warm. The choc-tops were very lovely, quite sweet (probably not helped by the melting gelato). I would love to make the cone mixture again, even if just in rounds to have with ice cream.

Choc Top

My notes to help the home cook:

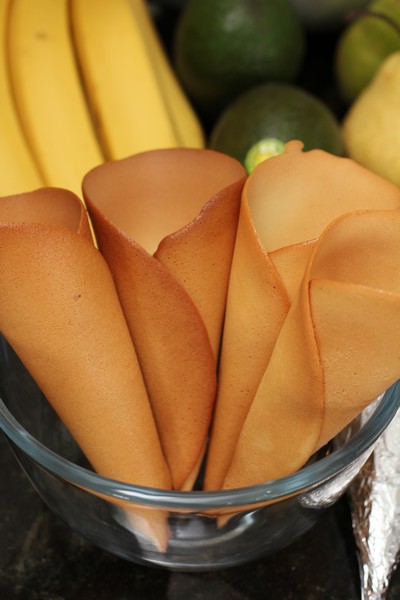
    • I made 1/3 of the almond meal, hazelnut paste and gelato (this base was placed in my two ice cream makers). I made half the quantity of the amaretti, ganache, chocolate dip and cones (it made 7 cones – which only used about half the gelato and even less of the biscuits).
    • I used some cotton gloves handle the cones before setting.
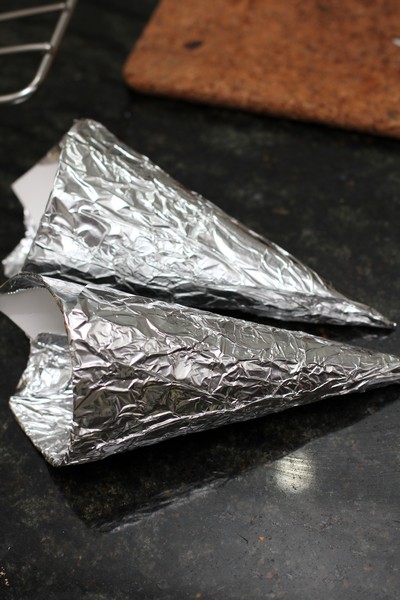
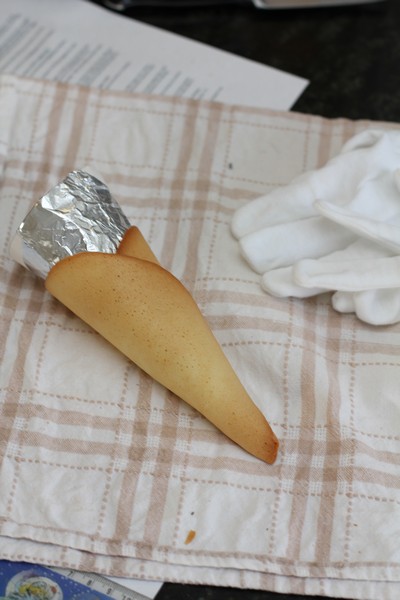
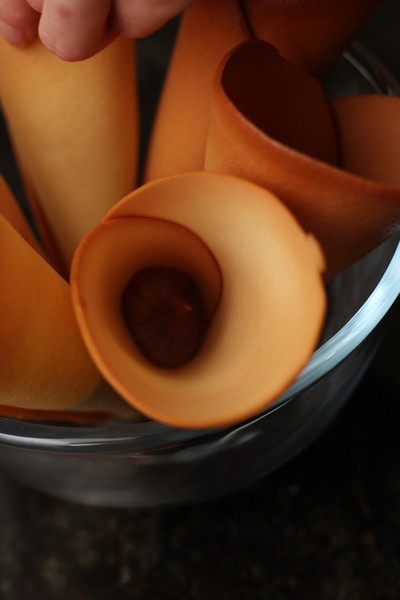
    • I made my own templates for moulding the cones. Cut an A4 piece of cardboard in half. Twist the cardboard, making the middle of one of the long edges the point of the cone. When satisfied with the shape, staple in place and then cover in foil.

Homemade cone rollers

  • I found a skin formed on the top of my gelato base, as it was left in the fridge overnight (I just whisked it back in).
  • I made the ganache and Italian meringue 3 hours before serving, and this was fine (could have even gone longer).
  • I churned the gelato and placed it in the freezer 2 hours before serving, and it should have been in longer. Once I piped it into the cones it was already melting, although we didn’t have time or space to leave them to set in the freezer for longer – this made dipping them in the chocolate very hard.

Choc Top Extraordnaire

Recipe by Nick Palumbo (recipe seen on MasterChef season 6)

Ingredients
Almond Meal:
100 g almonds, skin on

Hazelnut Paste:
200 g hazelnuts
20 g vegetable oil (I needed a little more oil than this)

Gelato:
3000 g milk
200 g egg yolks
70 g maltodextrine (I used dextrose, as I didn’t find this in time)
300 g skim milk powder (I used normal milk powder, as that’s what I had available)
20 g Murray River salt
800 g caster sugar
1000 g cream

Amaretti Biscuit:
100 g egg white
100 g icing sugar
100 g sugar
5 grams bi-carb soda
pinch cream of tartar
5 g bitter almond extract (I used vanilla essence, as I don’t like almond essence)
30 g almond meal

Ganache:
50 g hazelnut paste
160 g cream
20 g dextrose (glucose powder)
40 g liquid glucose
160 g milk chocolate

Italian Meringue:
125 g egg whites, room temperature
200 g sugar
50 g liquid glucose

Sugar Cone:
4 egg whites
230 g caster sugar
80 g milk
2 g vanilla extract
pinch salt
170 g plain flour plus more for dusting
40 g unsalted butter, melted
cooking spray

Chocolate Dip:
320 g dark chocolate
40 g hazelnut paste
120 g cocoa butter

Method

Preheat one oven to 150C and a second oven to 195C.
To make the almond meal, place almonds on a baking tray and place in the 195C oven for 8 minutes. Remove from oven and place in blast chiller to cool down. Transfer almonds to the thermomix and blend to make almond meal, being careful not to blend too much. Set aside to use in the amaretii biscuit.

To make the hazelnut paste, place hazelnuts and vegetable oil in a thermomix and blend until smooth. Pass through a drum sieve into a bowl and set aside to use in the ganache and chocolate dip.

To make the gelato, place milk in a 7 L saucepan, set over medium heat and heat to 40C.
Place egg yolks in a bowl and whisk till pale.
Place malodextrine, skim milk powders and salt in a bowl and mix until combined.
Once the milk hits 40 C, add the powders and blend. Pour about ¼ of the mix slowly into the egg yolks and keep whisking. Then, pour the yolks with a ¼ mix, back into the saucepan with the rest of the mixture and bring up to 75 C. Take off the heat and let stand.
In a large saucepan, place the sugar with a little water and make a slurry and put on a stove on highest heat and let sugar caramelize till you get a dark amber colour.
At the same time, place the cream in a saucepan and heat to just before boiling, careful not to burn the cream.
Once sugar is dark amber colour, take off heat and very slowly pour the hot cream in, being careful that it doesn’t bubble over.
Once sugar and cream are combined, add to the reserved mixture. Blend with a stick blender and strain into shallow pans. Transfer to the blast chiller and cool until the mix gets to around 5 degrees.
Transfer mix to the soft serve machine and set to production mode.

To make the ganache, place hazelnut paste, cream, dextrose and glucose in a thermomix and heat to 80C, speed 3. Turn off thermomix and reset to 37C, speed 3. Slowly add chocolate until combined. Transfer to a shallow container and place in the fridge to cool.

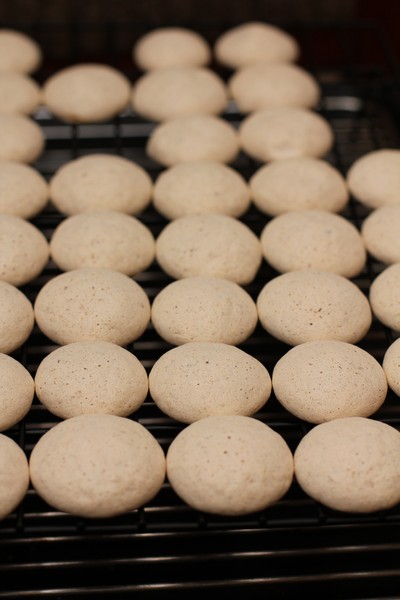
To make the amaretti biscuits, place egg whites, icing sugar and sugar in mixer with whisk attachment and mix until meringue forms and sugar is dissolved. Add bi carb and cream of tartar while still whisking and then add the bitter almond extract. Fold in reserved 30 grams almond meal. Transfer mixture to a piping bag and pipe small droplets the size of a 20 cent coin onto a paper lined tray.
Place in the 150C oven and bake for 10 minutes, reduce oven to 110 C and continue to bake until dry and crunchy, about 40 minutes. Remove from oven and set aside.

Amaretti

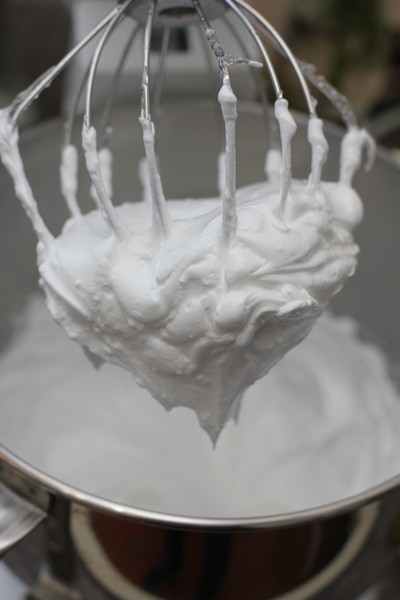
To make the Italian meringue, place sugar, glucose and enough water to make a slurry in a saucepan and set over medium heat. Heat to 121C.
While the sugar is heating, place egg whites in the bowl of an electric mixer and whisk until firm peaks form.
While the mixer is running, slowly pour in hot sugar syrup. Whisk until mixture is room temperature and thick and glossy. Transfer mixture to a piping bag and set aside in the freezer.

Italian Meringue

To make the sugar cone, place egg white, sugar, milk, vanilla and salt into a food processor and blend together for a few minutes. Add flour and butter and beat until fully incorporated and batter is smooth.
Lightly spray a 25cm crepe pan with a small amount of cooking spray. Pour 45gr of batter on to the cold pan and roll the pan around and tap it a little so you form what looks like a pancake about 18cm round, making sure it is even thickness all over.
Place pan in a preheated oven at 195 C until a nice tan colour around edges, about 9 minutes. Take out and flip and place back in oven for another 1-2 minutes.
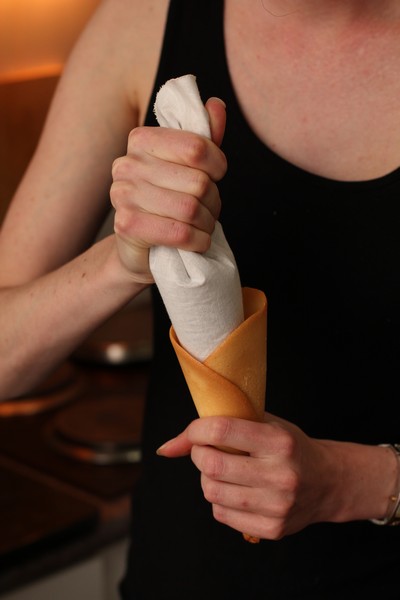
Take pan out of oven and quickly lay sugar disc onto a clean towel and top with cone roller, leaving enough of the disc sitting off the edge of the roller to allow for a pointed cone base to form. Using towel and cone roller as a guide, roll sugar disc into a cone shape with a 6cm opening. Hold seam side down for 1 to 2 minutes or until cone cools, making sure to also pinch the bottom of the cone so there is no hole at the bottom.
Cool pan completely in an ice bath, wipe dry and repeat until all batter has been used. Set cones aside.

Rolling the cone

Cones

To make the chocolate dip, place chocolate, hazelnut paste and cocoa butter in a thermomix and set on time 10 minutes, temperature 50, speed 4. Set aside, keeping at 50C.

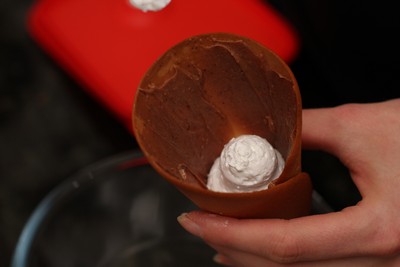
Transfer the ganache to a piping bag and return to the fridge.

To assemble the cone, take the ganache piping bag from the fridge and pipe a little into the base of the sugar cone. Using a small palette knife, work the ganache up the inside wall of the cone all the way up to the opening, making sure to have the same thickness lining the inside of the cone.
Piping
Ganache
Take the Italian meringue piping bag from the freezer, cut the tip and pipe a little into the cone. Using a small palette knife, work the meringue up the inside wall of the cone all the way up to the opening, making sure to have the same thickness of meringue lining the inside of the cone.
Meringue and Ganache

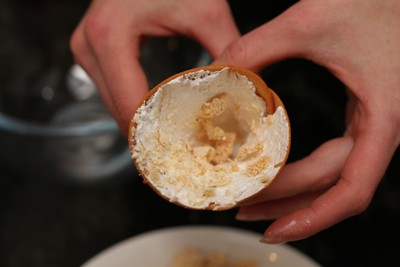
Crush amaretti biscuits finely and sprinkle inside the cone covering the meringue. Tip cone upside down to remove any excess crushed amaretti that didn’t stick to the meringue.
Meringue and Amaretti
Place the cone hard up to the gelato machine and ensure that the gelato packs firmly inside the cone. Once you have packed the cone level, slowly turn the cone around in a circular motion to achieve the classic soft serve cone. Place in the blast chiller to firm up for 1 minute.
Piped caramel gelato
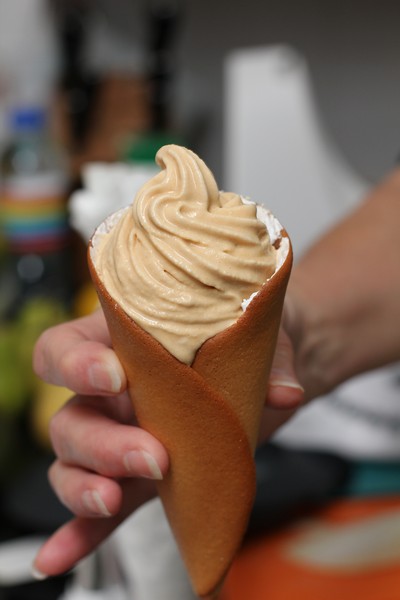
Remove gelato from blast chiller and stab the gelato with the Italian meringue piping bag and pipe in 3 lots of meringue.
Stab the gelato with the ganache piping bag and pipe in 3 lots of ganache. Return the gelato to the blast chiller to firm 1-2 minutes.
Dip the cone in the chocolate topping ensuring that you cover the gelato and at least 2 cm of cone as well, ensure it doesn’t run down the cone by keeping it on an angle.
ChocTop
Sieve crushed amaretti biscuit and sprinkle the gelato with larger pieces of crushed amaretti biscuit.
Serve


Surprise Cakes – Daring Bakers Challenge July 2014

July 28th, 2014

Surprise Heart Cake

For the July Daring Baker’s Challenge, Ruth from The Crafts of Mommyhood challenged us to bake a cake. But not just any cake; she asked us to add in a special surprise for our eyes as well as our taste buds!

Surprise Heart Cake

I’m glad this months challenge is done! On Friday night, I spent a few hours, cooking, colouring, carving and icing the surprise cake for the daring bakers challenge.

Surprise Heart Cake

It doesn’t look anywhere near as beautiful as the heart cake made by Amanda Rettke in her Surprise-inside Cakes book, but I am glad with how mine turned out, considering this was my first time, I was in a rush, and I probably chose the wrong cake recipe. (I used a cupcake recipe, but this had too much air and made bubbles, which doesn’t help with the carving)

For a great tutorial on how to make the actual cake, please see this website.

I didn’t want a huge cake (as I didn’t really have an event to make this for), so I made 2x quantity of cupcake mix, and cooked up a loaf tin plus a few cupcakes (which I coloured in varying pink shades). I placed both the loaf cake, and cupcakes in the freezer once they had cooled, so I could carve them better. And once I had a 3D heart carved out of one of the cupcakes, I made the indents in both halves of the loaf tin (which I had cut with a circle cutter).

Surprise Heart Cake

Creating the ruffles was the easy part! (there are heaps of tutorials on the web). As much as I didn’t feel I had the energy to make the cake, I am glad I managed to make it. Challenge complete!

Assembly

Assembly

Assembly

The mess