Main Meals

Bacon Kaboom Meatloaf

Wednesday, July 12th, 2017

Bacon Kaboom Meatloaf
I first saw this recipe in my delicious magazine one month, and it turned out so well I decided to buy Billy Law’s book Man Food, as it had heaps of yummy looking recipes. The use of pork mince, with minimal additions and slow cooking produces a lovely moist meatloaf. The main highlight for me is the bacon lattice, followed closely by the filling and spices.

Bacon Kaboom Meatloaf Burger

Served with coleslaw on a fresh bun, it certainly is a tasty dinner or lunch option.

Bacon Kaboom Meatload

Recipe adapted from Billy Law’s recipe

1 kg minced pork
1 tablespoon salt
1 tablespoon ground white pepper
1 tablespoon garlic powder
1 tablespoon dried sage
1/2 -1 teaspoon cayenne pepper or chilli powder
15 bacon slices
2 tablespoons olive oil
80 ml smoky barbecue sauce
125 g shredded cheddar
1 gherkin, chopped finely
6 slices jalapeño chillies, chopped finely
Coleslaw and fresh rolls, for serving

Preheat oven to 140C.

Remove the rind from the bacon and trim the bacon to equal widths, about 2–3 cm. Cut the off-cuts into thin strips or squares.

Heat the oil in a large frying pan, cook the off-cut bacon pieces until browned and crisp, about 3 minutes (or longer). Drain on paper towel.

Place a large sheet of baking paper on a baking tray. Weave the bacon strips on the baking paper.

BaconKaboomMeatloaf01

Put the pork in a large bowl, add the salt, pepper, garlic powder, sage and cayenne pepper/chilli powder. Using both hands, mix until fully incorporated. Do not over mix.

Line another baking tray with baking paper, spread the meat mixture evenly to make a huge rectangle pattie, about 2.5 cm thick and just a little bit smaller than the bacon weave. Brush with the barbecue sauce, spread a line of cheese on top of the pork at the edge closest to you. Sprinkle bacon pieces on top of the cheese evenly, followed by the gherkin and jalapeño.

BaconKaboomMeatloaf03

Starting from the edge closest to you, roll the pork tightly away from you, making sure the roll is firm without any air pockets inside. Carefully lift the roll and place on top of the bacon weave at the edge closest to you. With the help of the baking paper, roll the bacon weave and wrap the mince inside tightly, making sure the roll is sitting on top of the seam to stop it from coming loose. Fold the bacon strips inwards on both sides and secure with bamboo skewers or tooth picks.

BaconKaboomMeatloaf04

Cook at 140C for approximately 2 hours. Check after the first hour and determine whether you need to turn up the heat. Test whether it is cooked by inserting a thermometer into the centre of the roll – it should be 73–77°C.

Remove the cooked meatloaf to a serving board and let it rest for 10 minutes before slicing. Serve with coleslaw and fresh rolls.

Serves 8

BaconKaboomMeatloaf05

BaconKaboomMeatloaf06

BaconKaboomMeatloaf07

Nachos

Tuesday, March 7th, 2017

Nachos

Nachos are a big hit with my family. Introduced to our family by Nick, they have become a regular favourite, so it’s great to put this recipe up on the site so everyone can enjoy it whenever they please.

It’s a very easy recipe to make, we often have most of the ingredients on hand. Don’t be turned off making it if you were after one with meat, as it’s so delicious, you won’t even notice its absence.

Nachos

Nachos

Recipe by Nick at Leave Room for Dessert
Serves 4-6

2 tablespoons olive oil
2 onions, finely chopped
2 x 400g cans diced tomatoes
2 x 400g cans red kidney beans, rinsed thoroughly
1 teaspoon salt
1 teaspoon sugar
2 teaspoons cumin powder
2 teaspoons coriander powder
2 teaspoons paprika
1/4 teaspoon chilli powder

shredded lettuce (approx 1 large leaf, or 40g per person)
corn chips (approx 40g per person)
grated cheese (approx 30g per person)
guacamole, avocado, tomato, sour cream and jalapenos, as desired

Combine salt, sugar and spices in a small bowl and set aside. Heat oil in a large saucepan over medium heat. Cook onions for 10-20 minutes (lowering temperature as needed), until soft and caramelized.

Add the tomatoes, kidney beans and spice mix to the onions and cook for 10-20 minutes on medium heat, until red kidney beans are softening. Roughly mash the mixture with potato masher.

Nachos

Place shredded lettuce on a plate, followed by corn chips and then cheese. Place nacho mix on top and serve with sour cream, guacamole, avocado, tomato and jalapenos as desired.

Nachos

Nachos

Nachos

Five-hour Roast Lamb with Beans and Olives

Saturday, September 10th, 2016

Five Hour Roast Lamb with Beans and Olives

Wow! This was amazing. A wonderful aroma filled the house as this cooked, the meat fell apart and all the lovely juices soaked into the veggies.

Five Hour Roasted Lamb with Beans and Olives

The original recipe contained dried white beans which were cooked in with the lamb the whole time, although I found the liquid evaporated too quickly and the beans stayed dried and started burning. I think the roasting tray used in the original recipe was a bit smaller than what I used, so I decided to use canned beans the second time I made it, to make sure they weren’t crunchy, and they absorbed all the lovely flavours.

Five-hour roast Lamb with Beans and Olives

Recipe adapted from Taste (first found in Coles mag)
Serves: approx 6-8

1.8kg-2kg Lamb Shoulder (with the bone left in)
2 teaspoons smoked paprika
2-4 garlic cloves, thickly sliced
12 small oregano sprigs
12 small rosemary sprigs
2 cups (500ml) chicken stock
400g can white beans / cannellini beans, drained and rinsed
2-4 large potatoes, peeled and chopped (approx 1.5-2cm cubes)
200g green beans, ends trimmed, and chopped in half
200g cherry tomatoes
1/2 cup (80g) kalamata olives
Oregano leaves, extra, to serve
6-8 wholemeal or wholegrain wraps, to serve
Hummus, yoghurt or tatziki, to serve
(Alternatively serve with roasted or steamed veggies)

Preheat oven to 140C. Place the lamb on a clean work surface (or in the roasting pan you are using). Sprinkle with paprika. Use a small sharp knife to cut twelve 2cm-deep slits in the surface. Push a garlic slice, oregano sprig and rosemary sprig into each cut. Season well.

Five Hour Roasted Lamb with Beans and Olives

Place lamb in a large deep roasting pan, add chicken stock around the lamb. Tightly cover with foil. Roast for 4½ hours or until lamb is very tender. Depending on the size of your roasting pan, you may need to add some water around the 3-4.5 hour mark to make sure the base doesn’t burn, as the veggies will be cooking in the base. (check after 2 hours, if there is no or little liquid left, add a cup or two of water and check in another hour).

Five Hour Roasted Lamb with Beans and Olives

Increase oven to 200C. Uncover, add the potatoes and cannellini beans and roast for 20 mins or until lamb is golden brown (the potatoes should be almost cooked). Arrange the green beans, tomatoes and olives around the lamb. Roast for a further 10 mins or until beans are tender and tomatoes begin to collapse. Set aside for 10 mins to rest. Sprinkle with extra oregano, if desired. Pull apart the lamb using two forks or tongs and serve with veggies, or serve on wraps with your choice of toppings.

Five Hour Roasted Lamb with Beans and Olives

Five Hour Roasted Lamb with Beans and Olives

Five Hour Roasted Lamb with Beans and Olives

Five Hour Roasted Lamb with Beans and Olives

Five Hour Roasted Lamb with Beans and Olives

Spinach, Bacon and Rice Pie

Friday, June 12th, 2015

Nick’s veggie beds have really taken off, he has built 5 lovely raised garden beds (quite a while ago now) for his vegetable beds, and we have already had loads of onions, beans, tomatoes, peas, beetroot, pumpkin and even corn!

One of the easy veggies to grow is silverbeet, and we were very happy when ours lasted two seasons! After previously using it in Spanikopita, we decided this time around we would try out some new recipes.

I searched the web and found a very interesting one that had spinach and rice in the pie. To me that sounded a little odd – although I am certainly glad I tried it! It was a lovely pie, the bottom pastry didn’t go soggy, as the mix was not too runny, and all the flavours worked beautifully together. We have already made this pie a couple of times now and it’s great when you have extra silverbeet growing.

Spinach, Bacon and Rice Pie

Recipe adapted from Taste

Serves: 8

1 cup rice
2 cups water
2 sheets frozen, ready-rolled puff pastry, thawed
2 sheets frozen, shortcrust pastry, thawed (you can use extra puff pastry if you prefer)
1 bunch English spinach or silver beet, washed and shredded
1/4 cup peanut oil
2 small onions, finely chopped
2 cups tasty grated cheese
4 rashers bacon, chopped
4 eggs, lightly beaten
2 tablespoons milk, for glazing

Place rice and water in a small saucepan over high heat. Bring to the boil then simmer, covered, for 10-12 minutes (rice should be almost cooked). Rinse under cold water. Drain.

While the rice is cooking, heat 1 tablespoon oil in a medium saucepan over medium heat, cook the onion for 5-10 minutes, until soft (and caramelised if you like), add the bacon and cook another 2-5 minutes. Set aside to cool slightly. (Cooling is not that important if you are rushed on time).

Preheat oven to 220°C. Line a lasagna dish with 2 sheets of shortcrust pastry.

Combine rice, spinach, oil, onion, cheese, bacon and eggs. Mix well. Season with salt and pepper.

Spoon mixture into lasagna dish. Brush edges of pastry lightly with water. Top with remaining puff pastry. Press edges of pastry together (Use any left over puff pastry to decide a criss-cross pattern on top). Brush pastry top with milk. Bake for 18 to 20 minutes or until pastry is golden and crisp. Serve hot or cold.

Balsamic onion, pear and walnut pizza

Friday, June 5th, 2015

Balsamic Onion, Pear and Walnut Pizza

I have recently been going through my dozens (and dozens) of food magazines. Unfortunately i just don’t have the room to keep them all, and even if I did, once they get stored away, I don’t look at them. I’ve torn out hundreds of recipes I’d like to try and (sort of) ordered them into different categories. The plan for a while, was to cook at least 2 new recipes per week, although I found I kept losing some of my favourite recipes. This pizza is one of those new favourites.

Balsamic Onion, Pear and Walnut Pizza

It’s a very easy pizza to make (you can make the caramelised onion in advance, and make the bases if you like – or buy them). It is a wonderful combination of flavours and is lovely and sweet. A great pizza to make for a change to the more common toppings.

Balsamic Onion, Pear and Walnut Pizza

Balsamic onion, pear and walnut pizza

Recipe from delicious magazine, also available on Taste
Serves: 4

2 tbs olive oil
2 red onions, thinly sliced
1/4 cup (60ml) caramelised balsamic vinegar (bought or homemade)
1/4 cup (65g) store-bought pesto
1 Afghan bread or 2 thin based homemade pizzas
2 beurre bosc pears, peeled, cored, sliced, brushed with lemon juice
150g mozzarella, sliced
1/4 cup (25g) walnuts, toasted, chopped
Handful wild rocket leaves

Place a baking tray in the oven and preheat the oven to 220C.

Heat oil in a frypan over medium-low heat. Add the onion and a pinch of salt, then cook, stirring, for 10-20 minutes until softened and caramelised. Add 2 tbs vinegar and cook for a further 1 minute. Set aside.

Spread the pesto over the bread (or pizza base), then scatter with the balsamic onion and top with pear and cheese. Place on the hot baking tray and bake for 10 minutes or until the base is crisp and the cheese is golden. Remove from oven and sprinkle with the walnuts and rocket. Drizzle with the remaining 1 tbs vinegar, then serve

Balsamic Onion, Pear and Walnut Pizza

Balsamic Onion, Pear and Walnut Pizza

Balsamic Onion, Pear and Walnut Pizza

Balsamic Onion, Pear and Walnut Pizza

Balsamic Onion, Pear and Walnut Pizza

Slow-Cooked Beef and Mushroom Pie – Daring Bakers Challenge October 2013

Sunday, October 27th, 2013

Hannah of Rise and Shine was our October 2013 Daring Bakers’ hostess and she challenged us to bake our own double crusted savory pot pies. Using any from-scratch crust and filling we choose, we were allowed to get completely creative with our recipe, showing off the savory flavors and fillings from our own home or region.

Pie, Pie, Me oh My, I love Pie!

Pie is definitely one of my favourite comfort foods. Pastry just works with anything and everything! It makes a casserole better, a curry better, not to mention custard or lemon curd! But sweet foods were off our list! Never mind, it doesn’t take much convincing for me to make a pie. My only issue was how long it takes to get a truly lovely beef pie.

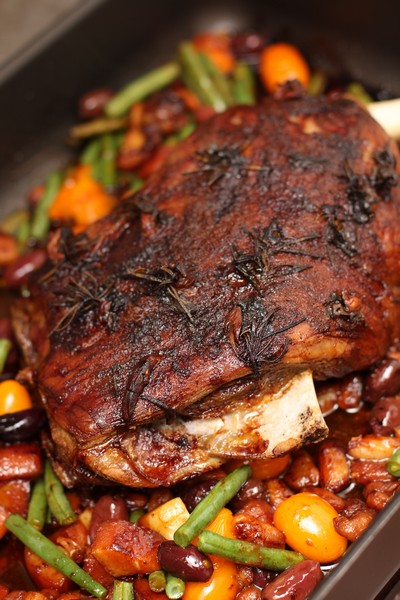
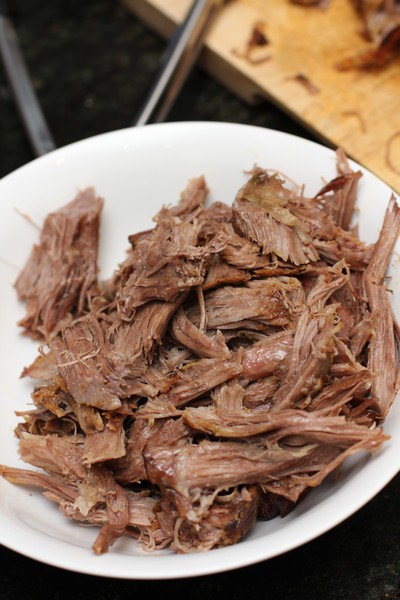
Many times in the past, I have made recipes using beef that was easy to prepare – not much fat, because I tend to be a little too pedantic when it comes to removing the fat from my meat. Gravy beef often just looks like took much effort, and I go for something like rump. Although it is easier to prepare, it doesn’t have the same flavour, and doesn’t fall apart and stay moist like this gravy beef did.

I had to be disciplined and only remove the major pieces of fat, leaving behind the fat running through the meat, and we were rewarded in the end. The rich gravy with wonderful flavours paired just beautifully with the buttery flaky pastry that was our challenge for this month. The pastry was super easy to make (I used a food processor, not sure if I was supposed to – but it made it that much more easy, and I needed to put my feet up and rest my back after the prep work for the casserole filling).

Thanks to our host, we sure were in the mood for comfort food last night. I had everyone commenting on how lovely the pie was.

Slow-Cooked Beef and Mushroom Casserole

Recipe by Anita @ Leave Room for Dessert

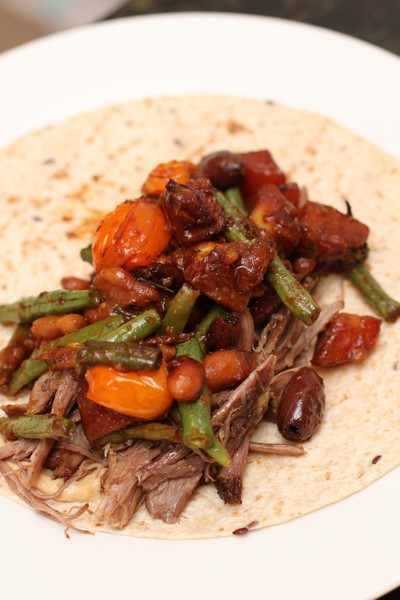
This mix can either be cooked and served with rice, veggie mash or in a pie casing (as is done here).

Serves 8 (fits into one lasagna dish)

Time: 2 hours of cooking, plus ~30min prep (+ 30 minutes, if making into a pie)

1 kg gravy beef, large pieces of sinew discarded, remaining meat cut into chunks 2-3cm diameter)
1/4 cup plain flour
1/2 teaspoon salt
1/4 teaspoon oregano
4 tablespoons olive oil (more or less, depending on your pan)
2 onions, chopped
1 celery stalk, chopped
1/2 teaspoon salt
4 cloves garlic, crushed, chopped or sliced
1 cup red wine
1 cup beef stock
4 tablespoons tomato paste
1 teaspoon mixed herbs
salt and pepper to taste
2 carrots, chopped
400g mushrooms, quartered (or cut into sixths or eighths if mushrooms are large)
1 tablespoon cornflour + 1 tablespoon water – optional, for thickening at the end if required

1 quantity of flaky pastry below – or 2 sheets shortcrust pastry + 2 sheets puff pasty

Combine the plain flour, 1/2 teaspoon salt and oregano. Lightly coat the beef pieces, removing excess flour. Discard remaining flour mix.

Heat a large saucepan over medium/ medium-high heat. Add a tablespoon of oil and fry about one third of the beef for a few minutes on each side. Remove, and repeat with remaining batches or meat. (depending on how much the meat sticks, may determine how much oil to add).

Once all the beef is seared and removed from the pan, add a tablespoon of oil and cook the onion, celery and 1/2 teaspoon salt together for a few minutes on medium until slightly translucent (it will cook for a long time, so don’t worry too much). Add the garlic and stir for a minute. Add the wine and allow it to come to the boil. Cook to remove anything stuck to the bottom of the pan, and reduce until there isn’t much liquid left in the saucepan.

Add the beef back into the saucepan along with the beef stock, tomato paste and mixed herbs. Cook on low, with the lid on for 1 1/2 hours (now is the stage to make the pastry if you haven’t already done so, and aren’t using pre-made shortcrust and/or puff pastry). Then add the carrots and mushrooms and cook, without the lid, for a further 30 minutes. (If you plan on serving without cooking in a pie, you may want to add the carrots earlier – maybe 45-60mins before cooking). While this is cooking, you can preheat the oven to 180C, and start to prepare for the pie (if making).

The beef should be falling apart by this stage. This is now ready to serve, or you can thicken the juices if it requires thickening. I removed all my mix, and left only the extra sauce in the saucepan. Combine the cornflour and water and whisk it into the juices, cooking it on medium heat. You may decide to cook for longer or add more cornflour if you like.

Flaky Pie Crust

This recipe was by our host this month, Hannah of Rise and Shine

(These instructions are for a round pie dish, if making a lasagna dish, roll out pastry into rectangles, both before chilling and after) I used a food processor for the whole process

Servings: about 8 (one 9 1/2 inch (24 cm) pie), or one lasagna dish

3 1/2 cups ( 840 ml)(17 ¼ oz)(490 gm) all-purpose (plain) flour
1 tablespoon (15 ml) (½ oz) (13 gm) brown sugar, firmly packed
1 1/2 teaspoons (9 gm) salt
1/2 cup (120 ml) (4 oz) (115 gm) cold shortening (I always use butter flavored), cut into pieces
3/4 cup (180 ml) (6 oz) (170 gm) cold unsalted butter (I didn’t use shortening, and used a total or 280 g butter)
1 cup (240 ml) ice water

1. Mix flour, sugar and salt in a large bowl. Drop in shortening and quickly grate butter directly into the bowl using a cheese grater.

2. Using your fingers, a fork or a pastry cutter, work butter and shortening into the flour mixture until it’s broken down into course, chunky crumbs. Stop mixing when the largest crumb is about the size of a pea.

3. Using a fork, quickly stir in very cold ice water. Turn the rough dough and crumbs onto a floured surface.

4. Knead just until dough starts to hold together in a rough mass, up to 10 times. Do not over mix! You will be able to see chunks of butter in the dough and this is a good thing.

5. Divide the dough in half and pat each half into a disk. Wrap each disk in plastic wrap and refrigerate for at least an hour before use. The dough will keep in the fridge for a full day, or you may freeze the dough for up to 3 months (and bring back to a thawed chill before rolling).

11. Roll out one half of the chilled dough about 1/4 inch (5 mm) thick using a floured rolling pin on a well-floured surface. Once your round of dough is about ten inches (25 cm) across, dust the top with flour, pick the round up from the counter and dust under the dough again before rolling out completely to about 15 inches (38 cm) across. Hold your pie plate up to the round of dough to ensure it is large enough to fit your pie plate.

12. To set the dough into your pie plate, fold the round of dough in half, then in half again to create a large triangle of dough. Point the tip of triangle of dough into the center of the pie plate and unfold. Be careful not to stretch the dough while you ensure that you have the dough tucked into all corners.

13. Pour the filling into the unbaked pie shell.

14. Roll out the top crust and cover the filling. Trim excess dough and seal the edge crust by folding the top dough layer under the bottom and pinching the dough together with your fingers or pressing with the tines of a fork.

15. Bake in the lower third of your oven until the pastry is golden brown, 45 to 50 minutes (Mine only took 30 minutes, so check after 15 minutes to get an idea). To ensure the bottom is browned, you may choose to prop an electric oven open using the handle of a wooden spoon for the last ten minutes of the baking time. If at any point you fear the top crust is over-browning, cover with foil for the remainder of the baking time. Serve immediately while warm.

Empanadas – Daring Bakers Challenge September 2012

Thursday, September 27th, 2012

Patri of the blog, Asi Son Los Cosas, was our September 2012 Daring Bakers’ hostess and she decided to tempt us with one of her family’s favorite recipes for Empanadas! We were given two dough recipes to choose from and encouraged to fill our Empanadas as creatively as we wished!

Nick’s veggie beds are all made 🙂 After the removal of some palm trees and their never ending root system, a partly new fence, a sturdy woodshed (made by my very talented Dad), there was finally room and time for Nick to make some raised garden beds. He used retaining wall blocks to build 5 veggie beds. On the weekend we were able to harvest our first broad beans from the bed, and we shared them with family – just as we shared this month’s Daring Bakers Challenge.


This recipe was quite easy to make and very tasty. I would love to make it again – maybe with a few changes on the ratio of bread to filling. (see my notes below). After seeing how easy it is, I’d love to try some more fillings.

My notes on the recipe:
I made double the meat mix and 1x the dough mix. Next time I will make about 4x the meat mix (~1kg), and 1x dough – and make it into 2x emapanadas (one on each tray).
We added extra spices to the meat mix – try some salt, and cumin powder (and maybe some tomato paste). I also used mushrooms and red capsicum.

Empanadas

Serves about 8-10


Dough Ingredients:

5-1/3 cups (1280 ml) (750 gm) bread flour
2 cups (480 ml) of lukewarm water (about 85°F/30ºC), approximately
1 satchel (1 tablespoon) (15 gm) dry yeast or (1 oz) (30 gm) fresh yeast
2 teaspoons (10 ml) (11 gm) salt
4 tablespoons (60 ml) oil (you can use oil from the pan where you have cooked the filling)
1 large egg, for egg wash

Measure out all the ingredients.
Shift the flour into a big bowl and make a well in the middle. Rub the yeast in with your fingers.
In a small bowl, mix the water and the salt.
Now, using your fingers or a wooden spoon, start adding the water and mixing it with the flour-yeast mixture. Keep on working with your fingers or spoon until you have added enough water and all the flour has been incorporated and you have a messy ball of dough.
On a clean counter top, knead the dough for approximately 10 minutes
You could do all the above using a stand mixer, in that case mix the ingredients with the paddle attachment until mixed and then switch to a dough hook and knead on low for about 6 minutes.

Clean and oil the big bowl you used for mixing and place the kneaded dough in it. Cover it with a napkin or piece of linen and keep it in a warm, draught-free place for approximately 40 to 50 minutes.

Once risen, turn the dough back into a floured counter and cut it in half. Cover one half with the napkin to prevent drying.
Spread the other half of the dough using a rolling pin. You can use a piece of wax paper over the counter, it will make it easier to move the dough around. Depending on the shape of your oven pan or cookie sheet, you will make a rectangle or a round.
Now, the thinness of the dough will depend on your choice of filling and how much bread you like in every bite. For your first time, make it about 3mm thin (about 1/10th of an inch) and then adjust from that in the next ones you make.

Ground meat filling:

400 gm (14 oz) chopped onion (approximately 1 big onion or 2 medium-sized ones)
200 gm (7 oz) tomatoes (peeled and seeded)
1 small green pepper
2 garlic cloves
¾ cup (180 ml) olive oil
300 grams (2/3 pound or 10.5 ounces) minced (ground) meat
1 teaspoon sweet paprika

Heat the oil in a skillet
Fry the finely chopped onions, pepper and garlic until the vegetables are soft. Add then the tomatoes, chopped small, and cook until done.
Add the meat and cook for about 5 minutes.
Add the paprika, and stir into the frittata.
Allow to cool for at least 30 minutes.
Fill the empanada en bake as indicated.

Assembling the empanada:

If you haven’t used wax paper, either lightly flour or line with wax paper your pan or tray.
Cover the base and sides with the dough. Using the rolling pin or a knife, cut the extra dough.
Place the filling, making sure it is cold and that all the base is covered. Using a hot filling will make the bottom layer of the empanada become soggy. Be careful to avoid adding too much oil from the filling, try to make it as “dry” as possible.
Start preheating your oven to moderate 350°F/180ºC/gas mark 4.
Take the other half of the dough and spread it out to the same or less thinness of the base. You can use a piece of wax paper for this too. Take into account that this “top” dough needs to be smaller around than the bottom, as it only needs to cover the filling.

If not using wax paper, move carefully the top to cover the filling. If using wax paper, transfer the dough, turn upside down, cover the filling and gently peel off the wax paper.
Using your fingers, join bottom and top dough, when you have gone all the way around, start pinching top and bottom together with your thumb and index finger and turning them half way in, that way you end up with a rope-like border. As a picture is worth a thousand words, please watch this video to see how it is done: http://youtu.be/CNpB7HkTdDk
When you are finished, make a 1 inch hole in the middle of the top layer. This will help hot air exit the empanada while it’s baking without breaking the cover.
You can use left-over dough to decorate the empanada, using rounds, bows, lines… let your imagination flow and make it pretty!
Using a fork, prick the top layer or, using scissors, make snips that go all the way through the top layer.
In a small bowl, beat an egg and add a tbsp of cold water. With the pastry brush, paint the top of the empanada with the egg wash.

Place the empanada in the oven and bake for about 45 minutes. Check that the bottom part is done.

Vegetable Burgers with Chilli Mayo

Sunday, July 10th, 2011


There are some recipes that once tried, just need to be shared with others.

I love burgers, my Mum and Nick both make great beef burger patties, and I will often order chicken schnitzel burgers and beef burgers when out for dinner or lunch. I never tend to buy vegetable burgers, as I’ve had a few dry and tasteless ones in the past.

Trying these though, have changed my mind totally on the vegetable burger, and I have my sister to thank. It was easy to make (and would have been easier if I had taken my food processor around) and tasted amazing. No one could wait to have them for lunches the next day too, which meant we couldn’t try freezing them (as that would be a great dinner to take out of the freezer, just thaw and cook). I guess this means we will just have to make them again 🙂

The patty was a little more delicate in structure than a normal patty, and this slightly worsened for the lunch meals, although perhaps we needed to pat out some of the liquid. Nonetheless – what an amazing dinner and lunch!

I think it’s about time we made another batch – let me know if you get a chance to try them 🙂

Vegetable Burgers with Chilli Mayo

Recipe adapted from Best Recipes

Makes approximately 12 burger patties

1 tablespoon olive oil, approx
1 onion, diced finely + a pinch of salt
2 x 400g can chickpeas, rinsed in water, drained and patted dry, then roughly chopped or processed
1 sweet potato, peeled and grated
1 zucchini, grated
2 carrots, peeled and grated
2 teaspoons curry powder
3 teaspoons vegetable stock powder
2 eggs, lightly beaten
1 1/2 cups bread crumbs
2 tablespoons vegetable or olive oil for frying

6 tablespoons sweet chilli sauce
6 tablespoons mayonaise

12 burger buns
1 lettuce (6-12 leaves, sliced or torn)
2-3 tomatoes, sliced
2 tablespoons olive oil
3 onions, sliced + a pinch of salt
avocado, sliced, optional
sweet potato chips to serve, optional

Heat oil at medium heat in a medium saucepan, cook the diced onion, stirring occasionally until caramelised (will take about 10 minutes or more). Once caramelised, remove from heat and cool. Make caramelised onions for on top of the patty in the same saucepan with the 3 sliced onions and extra oil (will take more than 10 minutes) – Allow this to cook on low whilst making the patty mixture.

For the vegetable patty, mix the caramelised diced onions, chickpeas, sweet potato, zucchini, carrot, curry powder, vegetable stock powder, eggs and bread crumbs. Allow to stand for 10minutes, if the mixture is too moist, squeeze out excess liquid, or pat with a paper towel.

Divide the mixture into 12 equal portions, roll and then pat into patties the same size/width as the burger buns. Heat a large saucepan or frypan on medium/high heat and cook the patties in a small amount of oil until cooked through, turning once the first side is nicely browned.

Place the cooked patty on a grilled burger bun and top with chilli sauce mixed with mayonnaise, caramelised onion, lettuce, avocado and tomato. Serve with sweet potato chips or a salad.

Asparagus, Broad Bean and Poached Egg Tart

Sunday, October 24th, 2010

Asparagus is on a great special at the moment in the shops and is tasting fantastic too. I always like using fresh, seasonal ingredients, because not only do they have an amazing taste, they are likely to have traveled less distance to reach the shops, and are also a good price – which is important to most people.

I have only just started getting into eating asparagus. This year in particular has been one where my whole family is eating asparagus – and broad beans too. I now have broad beans with a lot of meals, although we are lucky if they make it to the plate – as I tend to eat them whilst shelling them.

This is a quick and easy meal with fresh ingredients. I wish I was growing asparagus and broad beans as that would make it even more enjoyable and fresh. I haven’t left you with a recipe of how to poach eggs, as I haven’t come across a fool-proof way of making them yet so they look good. For my ones (which still tasted great), I boiled up water in a medium saucepan, added a splash of vinegar, stirred
the water, then added the egg. The eggs came apart a bit whilst cooking, although stayed together enough – they cooked for 2-4 minutes and were then drained.

Asparagus, Broad Bean and Poached Egg Tart

Recipe by Anita @ Leave Room for Dessert

Serves: 4

1 tablespoon olive oil
5 large onions, sliced
1/2 teaspoon salt
2 bunches of asparagus
2 cups broad beans
4-8 poached eggs
2 sheets puff pastry, thawed and halved
Caramelised balsamic vinegar to serve
Shaved Parmesan cheese, to serve

Preheat oven to 180C.

Heat oil in a medium saucepan on high. Add the onion and salt, stir and turn the heat down to medium/low (alternating if need be to make sure the onions don’t burn). Cook for 10-20 minutes until the onions are caramelised.

Place pastry halves on two lined baking trays. Divide the onion mix across the pastry halves, leaving a 2cm gap around the outside edges. Cook in the oven for 10-20 minutes until the pastry on the outside is puffed and golden brown.

Whilst the tarts are cooking, poach the eggs (with the method I used above, or according to your preferred method), and cook the asparagus and broad beans.

To cook the asparagus and broad beans, boil water in a medium saucepan. Place the broad beans in the water and cook for 2 minutes, or a little longer if they haven’t come to the surface of the water. Place in cold water straight away, to stop the cooking. Remove skins from the broad beans. Place the asparagus into the boiling water and cook for 2 minutes. Place in the cold water.

Rinse the broad beans and asparagus under a small amount of hot water, before draining and placing on top of the cooked onion tart. Top with 1-2 poached eggs per tart and drizzle caramelised balsamic vinegar around the edges.

Steamed Barbecued Pork Buns – Char Siu Bao

Sunday, February 14th, 2010

PorkBuns18

Happy Chinese New Year! The year of the Tiger has just begun and I decided to celebrate by making my first ever steamed barbeque pork buns.

PorkBuns20

The thing I love about barbecued pork buns is how sweet they are. I tend to add a tablespoon of sugar or more to most savoury dishes I make, although these go one step further – and I’m not complaining. 🙂

PorkBuns28

They do go well with other yum cha dishes as well, like some dumplings I recently made and I’ll have to post on them when I’ve perfected the recipes a bit more…

PorkBuns23

Enjoy! And Happy Chinese New Year! (I hope those who are celebrating Valentines Day also have a great day and weekend!)

PorkBuns25

Recipes altered by me from a number of websites.

Barbeque Pork

Makes enough for 48 buns, or Serves: 4

1 kg boned pork shoulder roast, large pieces of fat removed
½ cup hoisin sauce
½ cup soy sauce
1/ cup rice wine vinegar
1/3 cup honey
1 tablespoon sugar

Slice the pork into 2-3 cm thick slices. Mix together all other ingredients and place in a bowl. Add the pork and marinate for a few hours, or preferably overnight.

PorkBuns30

PorkBuns32

Preheat the oven to 200C and pour some water into a large roasting pan (not enough to reach the metal roasting rack). Place the pork on the roasting rack over the water. Cook for 10 minutes, then reduce the heat to 160C and cook for a further 30-40 minutes, turning and brushing on more marinade for a few times.

PorkBuns33

PorkBuns35

Once cooked, serve as is, or slice up. Alternatively, save it for pork buns, by allowing it to cool and using it once cooled or after storing in the fridge.

PorkBuns39

Barbeque Pork Filling

Makes enough for 24 buns

500g barbeque pork, (see recipe above) diced
1 spring onion/ shallot, finely sliced or chopped
1 garlic clove, crushed
1 tablespoon vegetable oil
1 tablespoon soy sauce
2 tablespoons hoisin sauce
2 tablespoons oyster sauce
2 tablespoons brown sugar
1 tablespoon honey
1½ tablespoons cornflour mixed with ¼ cup water

Mix together the soy sauce, hoisin sauce, oyster sauce, brown sugar and honey.

Heat a small saucepan or wok on medium/high heat. Add the oil, then the sliced spring onion. Cook for ½ minute, add the garlic and stir for 1 minute. Add the pork, stir for ½ minute, then add the sauce, mix, followed by the cornflour mixed with water.

Once the mixture comes together, about 1 minute. Remove from heat and allow to cool, for use in the pork buns later.

PorkBuns07

Bun Dough

Makes: 24

1 cup lukewarm water
1 teaspoon caster sugar
1 tablespoon yeast (~7g)
4 cups plain flour
1/3 cup white sugar
1½ teaspoons salt
2 tablespoons vegetable oil
½ cup boiling water

Mix together the lukewarm water, caster sugar and yeast in a large bowl. Leave for 10-20 minutes for the yeast to activate, while you get the rest of your ingredients ready.

PorkBuns05

Mix together the boiling water with the white sugar, salt and vegetable oil. Stir to dissolve the sugar and cool the water. Cool until lukewarm.

Add 3½ cups of the flour and the warm water to the yeast mixture. Mix to form a dough and then turn out onto a bench with the remaining ½ cup flour on it. Knead for a few minutes until the dough comes together nicely. Place in a large lightly oiled bowl and cover with plastic wrap or a tea towel. Leave for 1-2 hours in a warm place, until the dough has risen to double its size.

PorkBuns06

PorkBuns08

Tip the dough onto a lightly floured bench and lightly knead. Divide dough into 2 portions. Roll out one portion into a cylinder shape which is easy to divide. Divide into 12 portions. Roll out each portion into a small circle, large enough to fit a teaspoon of pork filling in the middle and to pull four sides of the circle, or pleat the edges to enclose the filling. Twist the top of the dough to seal the bun. Do the same with the remaining dough and mixture.

PorkBuns10

PorkBuns11

PorkBuns12

Place completed buns on pieces of baking paper in a bamboo steamer and cook straight away or leave for up to an hour before steaming over boiling water for 10 minutes. Serve.

PorkBuns09

PorkBuns15

PorkBuns29