Korena of Korena in the Kitchen was our May Daring Bakers’ host and she delighted us with this beautiful Swedish Prinsesstårta!
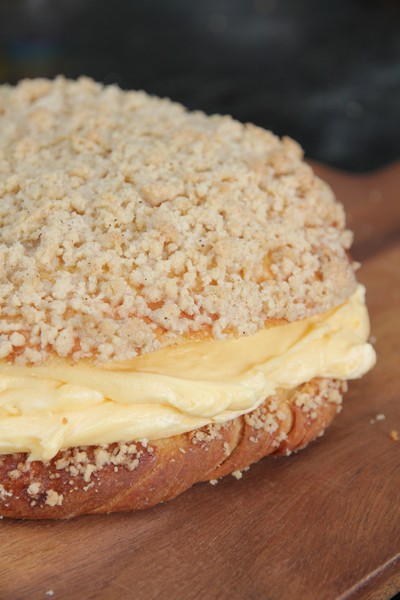
It didn’t take long to devour this months challenge. I had family members going back for seconds, which is always a great sign. I was actually a little surprised at how lovely all the relatively easy to make components were when combined.
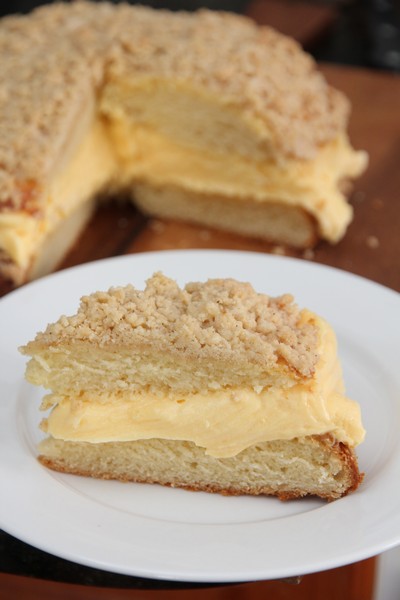
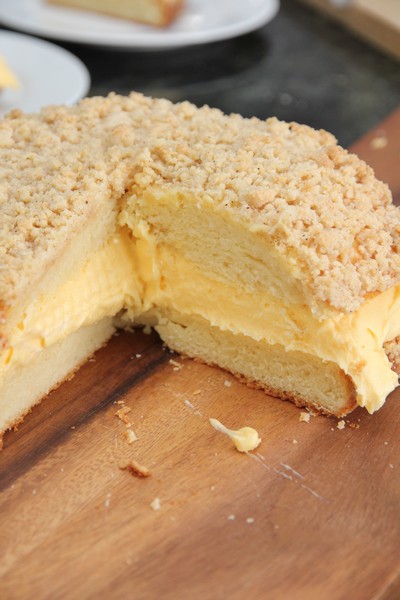
I had a little trouble cutting my cake into three layers, as the top was very nice and crunchy and a little sunk in the middle, so the top layer just fell apart – this didn’t worry me though, I just used it as the second layer and tried to spread the jam and custard the best I could. So I would probably make a bigger sponge to make it easier to cut next time.

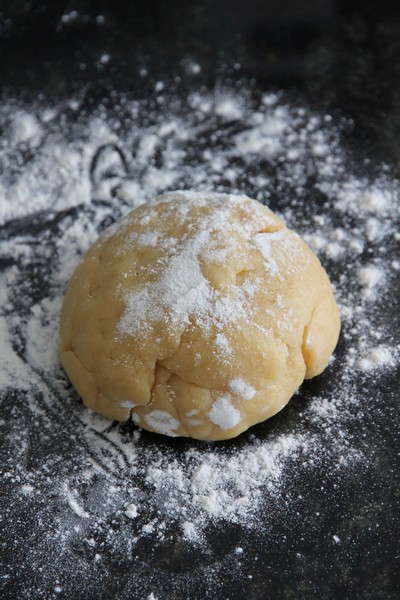
I also made my own marzipan, using the recipe provided with the challenge, as I am not a fan of the almond essence taste in the bought marzipan. So I added vanilla essence to my marzipan instead of almond essence and it tasted very nice and was extremely easy.
I am very happy to have made a prinsesstarta, and couldn’t be happier with how it looked or tasted.
Traditional Swedish Prinsesstårta
Cake components and assembly adapted from Semiswede
Custard method adapted from Tartelette
Servings: 8 – 10. Makes one 9” round cake.
Vanilla Custard
1 cup (240ml) heavy cream, divided
4 egg yolks from large eggs
2 tablespoons (30 ml) (15 gm) (½ oz) cornstarch
2 tablespoons (30 ml) (30 gm) (1 oz) granulated white sugar
1 vanilla bean, split and scraped (or 2 teaspoons (10 ml) vanilla extract)
1. In a medium bowl, whisk together the cornstarch, sugar, and egg yolks. Gradually whisk in ½ cup (120 ml) of heavy cream until smooth.
Meanwhile, in a medium saucepan over medium heat, combine the remaining ½ cup (120 ml) of heavy cream and the scraped vanilla bean and bring just to the boiling point. Remove the vanilla bean pod, leaving behind the seeds. Slowly whisk the hot cream into the bowl with the egg mixture to temper the eggs.
2. Pour the mixture back into the saucepan and cook over medium-low heat, whisking constantly, until it becomes thick like pudding and just comes to a boil. The mixture must hit a boil for the cornstarch to properly thicken the custard, and also to cook out any starchy taste. If it starts to look curdled or lumpy, remove it from the heat and whisk vigorously until smooth, then return to the heat. As soon as it comes to a boil, remove it from the heat. If using vanilla extract, add it now.
(If desired, pass the custard through a fine mesh sieve before continuing.)
3. Pour the custard into a clean bowl and press a piece of plastic wrap directly onto the surface to prevent a skin from forming. Refrigerate until completely cold. Can be prepared a day ahead and kept in the refrigerator.
Sponge Cake
(I would consider making 1.5 x this recipe, or use a smaller tin to allow easier cutting into 3)
Fine dry breadcrumbs for the pan (such as crushed panko)
4 large eggs, at room temperature
1 cup (240 ml) (225 gm) (8 oz) granulated white sugar
½ cup (120 ml) (70 gm) (2½ oz) all-purpose (plain) flour
½ cup (120 ml) (65 gm) (2¼ oz) potato starch (or cornstarch)
1 teaspoon (5 ml) (5 gm) baking powder
1/8 teaspoon salt
1. Preheat the oven to moderate 350°F/180°C/gas mark 4 with a rack in the lower third of the oven. Thoroughly butter a 9” (23 cm) round springform pan, line the bottom with a circle of parchment paper, then butter the paper. Dust the buttered pan with enough breadcrumbs to coat the bottom and sides, just like flouring a cake pan. Set aside.
2. Place the eggs and granulated white sugar in a mixing bowl and beat on medium-high speed with an electric mixer or stand mixer with whisk attachment until the eggs are tripled in volume and very light coloured and fluffy, about 5 minutes. The mixture should fall from the beaters in thick ribbons. Don’t overbeat the eggs – once they form thick ribbons and stop growing in volume, stop beating.
3. Sift the all-purpose (plain) flour, potato starch, baking powder, and salt into a bowl, then sift the flour mixture over the whipped eggs. With a balloon whisk, fold the flour into the eggs until blended, keeping as much air in the batter as possible. Use large, gentle yet confident strokes, bringing batter from the bottom of the bowl to the top. Once mixed, the batter should be quite thick and smooth.
4. Pour the batter into the prepared pan, spread it out evenly, and bake in the lower third of the preheated moderate 350°F/180°C/gas mark 4 oven for about 40 minutes or until golden brown on top, springy to the touch, and a toothpick inserted in the center comes out with a few moist crumbs sticking to it.
Let the cake cool in the pan for a few minutes then run a knife around the edge and remove the sides of the springform pan. Don’t worry if it sinks a bit in the middle.
Invert the cake onto a cooling rack and peel off the parchment paper. If the cake is lopsided, press gently to make it level, then allow it to cool completely before continuing. The cake can be made a day ahead and stored, well-wrapped in plastic, at a cool room temperature.
Marzipan Covering and Rose
10 oz (285 gm) marzipan
Green and yellow food colouring
Icing sugar, for rolling
Red food colouring
1. Set aside a small amount of plain marzipan (about the size of a walnut) to make a rose for decoration. Knead the remaining marzipan on a surface dusted with icing sugar until it becomes softer and smooth (the warmth from your hands will help this).
2. Add a small amount of green food colouring (I used 3 or 4 drops of liquid food colouring) and knead it into the marzipan to get the desired shade of green. You might need to add a little more green or yellow food colouring to get the right colour – anything from pastel green to bright spring green (just not neon green!) Wrap tightly in plastic and refrigerate until you are ready to cover the cake (or store as directed on the marzipan package).
3. To make the rose, tint the reserved plain marzipan with a tiny bit of red food colouring to make it pink. Dust your work surface with icing sugar and roll the marzipan into a log. With a rolling pin, roll it out into a long ribbon, about 1” (2 ½ cm) wide and 1/8” (3 mm) thick. Use plenty of icing sugar so that the marzipan doesn’t stick.
Press one long edge of the ribbon with your fingertip to thin it out slightly. Begin rolling up the ribbon, leaving the thin edge loose to form the petals of the rose. Start the roll off tightly, then loosen up as you go, pinching and gathering the marzipan to create creases and ruffles. Gently flare out the petals of the rose with your fingertip.
When the rose is large enough, cut off any remaining marzipan ribbon. Pinch off the excess marzipan from the bottom of the rose and set aside to dry slightly.
Prinsesstårta Assembly
2 cups (480 ml) heavy cream, chilled
granulated white sugar, to taste (scant 1 tablespoon is plenty)
Sponge Cake, cooled
1/3 cup (80 ml) seedless raspberry jam (or regular jam pressed through a sieve to remove seeds)
Vanilla Custard, chilled
Marzipan Covering and Rose
Icing sugar, for rolling and dusting
Optional: melted chocolate, royal icing, or piping gel
1. In a large bowl, whip the heavy cream until soft peaks form. Add sugar to taste (keep in mind that the rest of the cake components are sweet, so the whipped cream should be very lightly sweetened at most) and continue whipping the cream until stiff. You want it to be sturdy enough to provide structure to the cake, but not over-whipped enough to make butter. Set the whipped cream aside.
2. With a long serrated knife, slice the sponge cake into three even layers. This cake is very delicate, so do this as carefully as possible. Use a gentle sawing motion to move the knife through the cake instead of trying to pull it through the cake. Use a spatula to help you lift off each layer after you cut it. Set aside the middle layer – this will become the top layer of the assembled cake as it is the most flexible and therefore easiest to bend into a dome over the whipped cream.

see the layer at the back? That was the top layer that fell apart - oh well 🙂
3. Place one of remaining layers on a cake board or serving platter and spread it evenly with the raspberry jam. Spread or pipe half the chilled custard over the jam in an even layer, leaving enough room around the edges so that it doesn’t spill over the sides of the cake.
4. Top the custard with another layer of cake. Spread or pipe the remaining custard evenly over it, again leaving some room around the edges.
5. Reserve ½ cup (120 ml) of the stiffly whipped cream. Pile the rest into a mound on top of the custard. Spread it into a thick layer with a thin, flexible spatula or off-set spatula, then hold the spatula at an angle to shape the whipped cream into a dome, piling it up in the middle of the cake as much as possible.
6. Place the final layer of sponge cake (the one cut from the middle of the cake) on top of the whipped cream. Do not press on the top of the cake – instead, gently tuck the edges of the cake layer into the whipped cream, so that they are flush with the cream. This will create a smooth, seamless dome on top of the cake.
7. Gently spread the reserved ½ cup (120 ml) of whipped cream over the entire cake to fill in any cracks and even out the surface. If necessary, refrigerate the cake to firm it up before continuing.

8. Dust your work surface with icing sugar and press the marzipan into a 6-inch (15 cm) disc (knead it a bit to warm it up first). Coat both sides with icing sugar and roll it out into a 14” (35½ cm) diameter circle less than 1/8” (3 mm) thick. Use plenty of icing sugar to prevent it from sticking. Alternatively, you can roll the marzipan out between two wide sheets of parchment paper (still use plenty of icing sugar).
9. Use the rolling pin to drape the rolled-out marzipan sheet over the cake and smooth it around the cake gently with your hands.


If it seems like it wants to fold or buckle around the cake, gently lift and stretch it away from the cake with one hand while smoothing it down with the other.
Trim the excess marzipan from the bottom of the cake with a paring knife or spatula blade.
10. If desired, cut leaves out of the scraps of green marzipan (you can knead in another drop of green food colouring to make the leaves a slightly darker green). Use a paring knife to score vein-like lines, then pinch one end of the leaf to give it some shape.
Dust the cake with icing sugar, then place the marzipan rose and leaves in the middle of the cake.
(You can also use melted chocolate, royal icing, or piping gel to pipe a design on top of the cake, if you wish.)
11. To serve, cut the cake into wedges with a large, sharp knife (run the blade under hot water and wipe it clean after every cut for neater slices). The cake can be served immediately but will be easier to slice after chilling in the refrigerator for at least an hour.
Storage & Freezing Instructions/Tips:
The finished Prinsesstårta should be refrigerated until serving, and any leftovers refrigerated as well. Ideally the cake is eaten the day it is made, but will keep in the refrigerator for a day or so, after which it may lose its structural integrity and aesthetic appeal (but it will still taste good!)
Egg-free Marzipan Recipe
(adapted from Cake Central)
4 oz (115 gm) ground almonds
8 oz (225 gm) icing sugar
¼ cup (60 ml) corn syrup
½ teaspoon (5 ml) almond extract – I used vanilla essence instead as I don’t like almond essence
1 tablespoon (15 ml) lemon juice or water
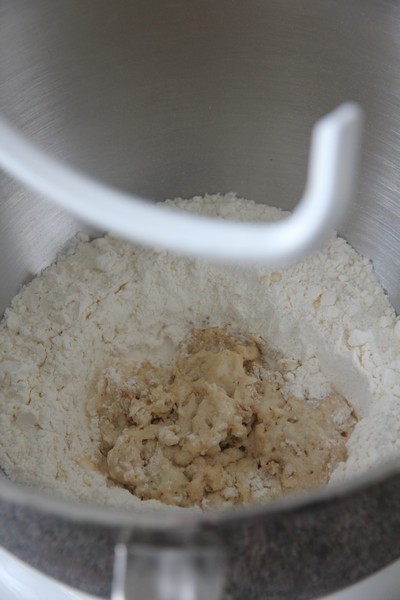
1. Place the ground almonds and icing sugar in the bowl of a food processor and pulse to combine and break up any lumps
2. Add the corn syrup and almond extract and pulse again to combine. The mixture should be quite dry and crumbly still.
3. With the food processor running, slowly drizzle in the lemon juice, stopping as soon as the mixture starts to clump together.
4. Scrape the marzipan out onto a work surface and knead it into a ball. Wrap in plastic and chill overnight in the refrigerator to let the flavours ripen. Makes just over 1 lb.