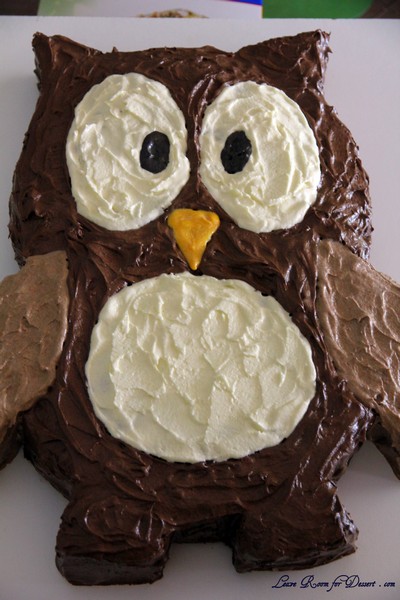
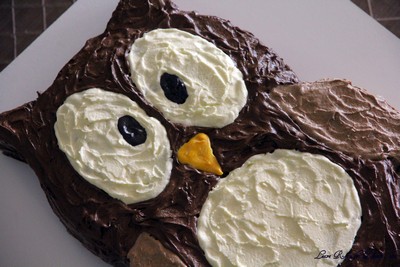
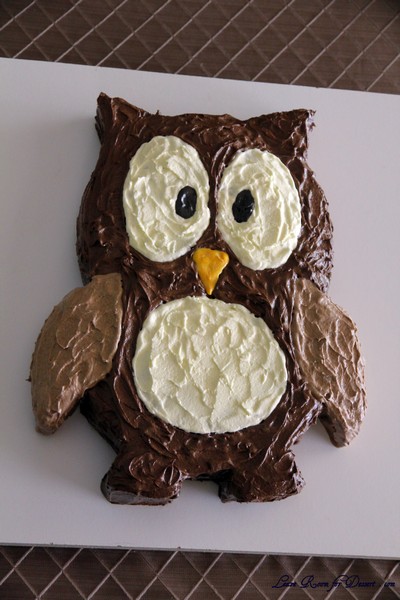
I just had to share pics of this cute owl cake we made this weekend. It was for my sister’s birthday, although is probably more suitable for a child’s cake.
Mum was making two round cakes, so I designed the cake to suit what was being made.
I had so much fun – and I think it’s so cute, I just want to design more cute cakes 🙂
How to make the Owl Cake
You will need:
2 x 22cm round cakes, cooled – these can be vanilla or chocolate or any cake that would work well with chocolate and vanilla icing – you can use 20cm or 24cm cakes if that is all you have
chocolate and vanilla icing
black and orange food colouring
a sharp knife
a large board for the cake
a chopping board
bowls for the icing
greaseproof paper for the design
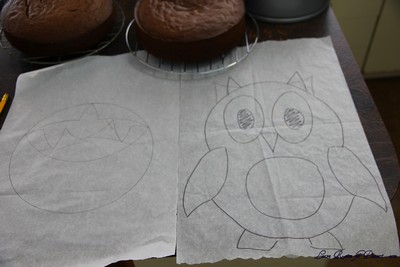
Firstly I designed the owl cake on greaseproof paper. Draw two 22cm circles (drawing around your cake tin) intersecting half way. Draw on the ears, eyes, beak, wings, belly and feet. Once you’re happy, go over the outline (plus eyes, beak and belly).
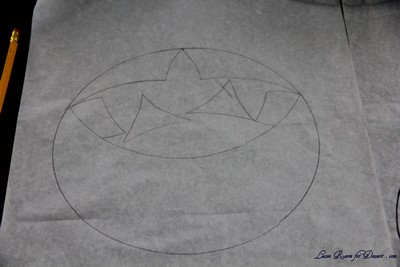
Next, you’ll need to draw one 22cm circle on a separate piece of grease proof paper. Draw out everything that does not fit in the circle which will be used for the belly (the head, ears, feet, and half wings). Make sure this all fits in the circle, as this will be used to cut out pieces of cake. Cut out the shapes. Make sure that both wings are the same size, as well as the ears and feet. If not, just use one template and reverse it for the other side when cutting out the cake.
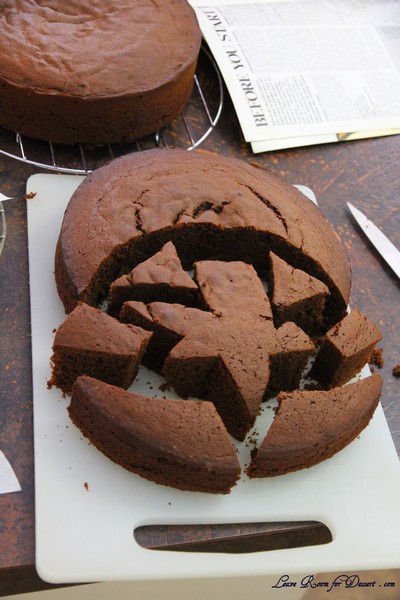
Place cut out templates on one cake and cut carefully with a sharp knife around the shapes.
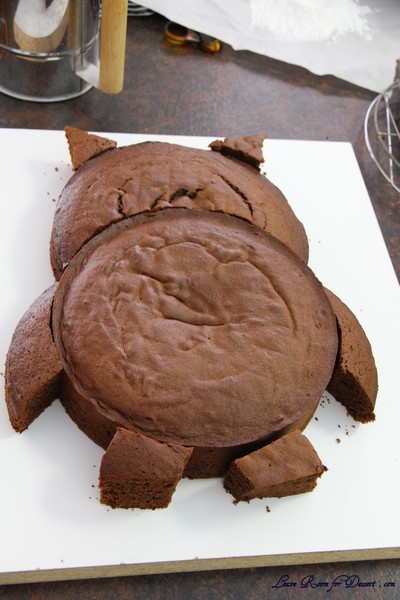
Place the cut of pieces of cake around the full cake to make the owl. Make sure this is on a nice serving board.
Draw the eyes, pupils, full wings, beak and belly onto greaseproof paper. (Only one eye and wing is required, as these can be reversed for the other side). Make sure your belly is round by drawing a rough circle, then folding it in half, in half again and again, until you get you get a wedge. Cut a curve in the paper to make the circle.
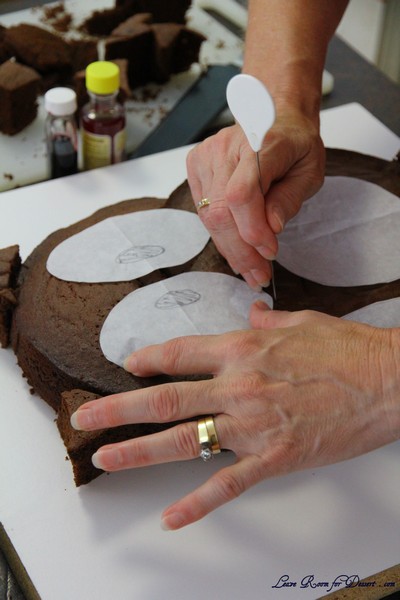
Place templates on cake and using a toothpick or cake tester go around each template so you can see where you need to apply the icing.
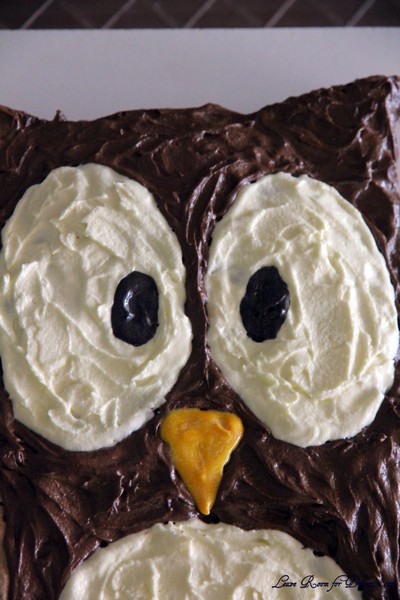
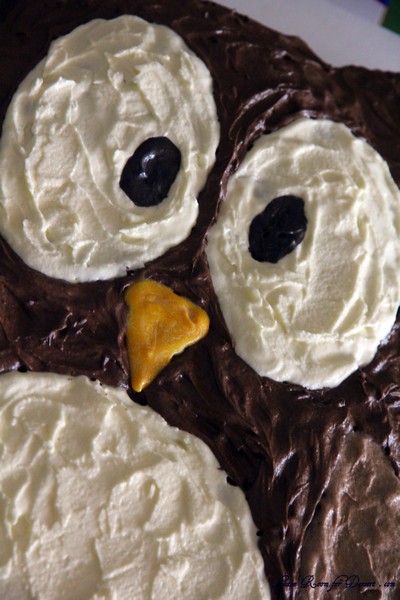
Attach the extra pieces of cake to the round cake with some icing. Cover most of the owl in chocolate icing. Mix some chocolate and some vanilla icing together for the wings. Use vanilla icing for the belly and eyes, and colour some chocolate icing black for the pupils of the eyes and the vanilla icing orange for the beak. Enjoy!



Naww too cute! And great instructions.
So adorable! Your sister must have been thrilled to have such a cake for her birthday! You should definitely make more cute cakes. 🙂
That is indeed so cute – just adorable. I love its big wide eyes
Wow, so detailed instructions and such a cute cake …
Yummy ….
Oh its so cute! Well done on the design 🙂 it looks fab!
I look forward to more kids cakes from you!
This is gorgeous! I am printing this off to use at the nearest available opportunity! Thanks for such detailed instructions and step by step photographs. Congratulations
OMG! A owl!!!!!!!!!!!!!!! (Sorry, a little private humour!)
Very cute! I love it! In fact my SIL would love it too…hmmm maybe I can make it for her birthday! Thanks for your detailed instructions too.
O RLY?!
YA RLY?!
NO WAIII!!!
Cuteneesssss ^^!
Oh he’s just beautiful! I like your trick with pricking holes to act as a template for the icing.
What fun! He’s wonderful.
Wow, the owl cake is absolutely gorgeous…love the step-by-step photos…beautifully done!
So cute! This gave me a great smile to begin the year with 🙂 Great jo, Anita!
Oh that is the cutest cake ever!!
This is adorable! I would love this cake – now just have to find someone to make it for me.
This cake serve how many pepole?
Hi Katia
This cake served more than 10 people when I served it. I would say probably 20 slices?
Cheers
Anita
Just wanted to let you know that I made this owl cake for my friends baby shower and it was a huge hit. Thanks for the great idea! I’m going to put pictures up on my blog…and will of course give you credit 🙂
I have been looking for a easy to follow guide to making a owl cake for my daughters 1st birthday ( its not until sept, but I wanted to try it out a time before the big day) because we love owls! Boy am I ever so excited to have found your site and this cake! you have saved the day Thank you!!!!!!! 🙂
Thank you so much for sharing your wonderful design! Like the person above, I was also looking for an owl cake template for my daughter’s 1st birthday, and when I saw yours it was exactly what I had in mind! Your tips and instructions made it really easy to perfect the cake.
I’m also going to put pics on my blog and will link to yours. I used fondant in the end for the final cake, have a look and see what you think of the result!
Thanks
Thanks for great instructions on what I was thinking was going to be an near impossible job! Now to do a practice cake before the First Birthday! Thanks x
I love it!!
What size cake pans did you use? I’m not even close to being a baker, but I’m going to try this one for my son’s 1st birthday. It seems pretty easy and you gave great instructions!
Oh, also, how much cake batter (boxed) will I need?
Thank you!
Hi Molly
Thanks for your message.
For this design, I used 2 x 22cm round cake tins (about 6-7cm high). You can use whatever cake tins you have though (e.g. 20 or 24cm cake tins).
You can always freeze your cakes after making them (and cooling them completely), this will make it easier to cut out the design – as fresh cake falls apart easily. It will also mean you won’t need to buy two tins, if you don’t require two normally.
In regards to the cake, you can use any recipe you find on the internet for vanilla or chocolate cake, or use a cake mix if it is easier. I think most cake mixes will make one 22cm cake, although you will need to check on back of the pack for instructions.
Thanks and I hope the cake goes well!
Cheers
Anita
I cannot wait to try this cake this weekend!! I wanted to make a cake for my best friends birthday who loves owls. This is the perfect idea & just what I had in mind! thanks for sharing!
I love that there is minimal waste with this cake, it looks easy to make and not too much food colouring. Love it. Thanks for sharing your creativity, can’t wait to see what you come up with next.
omg…this is too cute! will have to bookmark this for my daughters next bday!
That is super creative! I love it!
[…] from top left: 1. Cute Owl Cake 2. Pink Owl Party Cake 3. Festive Feathered Owl Cake 4. Upright Owl […]
Just made this for my girlfriends birthday! Easy and super cute, she loved it! Thanks!
I have to try this!! I’m going through an owl obsession….I linked your post on my blog.
♥alwasy,
Marisol
The Sea & Sol
This owl cake is so cute and was a hit at my daughters b-day party I loved the idea and so did my daughter so I gave the idea to my friend and her twins they loved it too thankyou for posting this
LOVE,
Mihaila shantell,keela,macey,Brooke,and Emily
Love the cake idea me and my 10 girls love it thanks for posting this
Love,amellia,Kate,Danielle,Avery,JaKoby,Kendra,Riley,Jordyn,Gaby,Mykayla,
and Reynah
I love this lollol lol
Thanks for the cute cake idea and instructions! I’m having an owl theme for my baby boy’s first birthday… going to try your cake! Thanks!! 🙂
I am definitely copying this! It is exactly what I was looking for, thank you for sharing. It is going to be for my son’ first birthday!!!
I just make this cake for my little ones baby showers. Thanks so much for the adorable idea and instructions! I am blogging about it today:)
Thank you so much for keeping this post up. I only just found it and totally love your adorable owl cake. I have added you to my Pinterest board so that all my followers can see it too. Thank you.
Cutest cake ever !
I made it for my daughter’s 6th birthday with pink, yellow, and blue icing. I used black jellybeans for the pupils and it turned out awesome. Thanks for posting this!
Just what I was looking for! Thanks for this recipe and great instructions. This is for my son’s 4th birthday and he is crazy for owls. Adorable and simple for me 🙂
[…] We made an owl cake using instructions from Leave Room For Dessert. The chocolate zucchini cake was the perfect consistency for cutting and reshaping the cakes into […]
Thank you for the great instructions and pictures. We made this cake for our two-year-old’s birthday party and it turned out wonderfully. I’ve posted pictures and the recipe I used here: http://clothdiaperguru.wordpress.com/2012/06/25/owl-themed-eco-birthday-party-ideas-for-two-year-olds/
[…] We made an owl cake using instructions from Leave Room For Dessert. The chocolate zucchini cake was the perfect consistency for cutting and reshaping the cakes into […]
Do you have to grease the cake pan?
I LOVE this cake and plan to make it for my daughter’s 1st birthday. I am obsessed with owls and thus my daughter has been subjected to the owl mania!
Found your site through Pinterest, fantastic instructions for an adorable owl cake! I am in the process of making it for my daughter’s 1st birthday, super excited to show off my skills to my family and friends. Thanks for making it easy to make something that looks so impressive. Newest fan!
[…] Or, Leave Room For Dessert teaches you how to make an owl cake at home with only two round […]
Hi. Thank you for sharing this adorable cake! I’m about to make it for my nieces graduation from university. Never too old for something so lovely.
This is adorable!!!
Thank you so much for this tutorial. This is perfect for my family reunion type party tomorrow. I’m probably going to make the eyes, beak, stomach and such in fondant, because I have an aunt I need to impress (she spent way too much on cake decorating supplies for my birthday recently).
Again, thanks,
Ashley from Alabama
Hi Anita,
Love this cake so much, am going to try it out for my daughter’s first birthday. Am a bit of a novice at these things but what type of icing do you use for this? Butter cream icing?
Fingers crossed mine will looks something similar to yours!
Thank you for the fab cake idea! x
i wanted to say a big thankyou for your tutorial, i made one for my nans 80th, she doesnt like icing, but loves butter cream so this was ideal. she has had a lifelong love for owls and was so pleased with her cake!!!
wish i could upload a pic for you!
thanks again 🙂 xxx
I know you wrote this a while ago, but thanks so much for posting it! I used your basic design (but without the feet) to create a cake for my daughter’s owl-themed first-birthday party and it turned out great!! 🙂
Here is a link to it on my blog so that you can see a picture: http://itsmombojumbo.blogspot.com/2013/04/pearls-first-birthday-bash-recap.html
[…] Inspiration for Cake […]
Wow! This cake is simply adorable and exactly what I want to make for my daughter’s first birthday! Thank you for sharing!
Do you have any tips on how you actually iced the eyes and tummy? Its so perfectly done and looks so neat. Did you use specific tools?
Thank you!! 🙂
THANK YOU! This was fantastic. Your instructions were awesome and I was able to save the day and make my son an owl cake for his 8th birthday. Thankful there are people like you on the web!
I used the basis of this idea and it worked well. I made a template but I cut it differently and I was able to utilize all pieces and I had a branch under the feet.
[…] make an owl shaped birthday cake. I found an easy idea on Pinterst which lead me to this wonderful tutorial that I changed a […]
Thank you for this one! My daughter is turning 5 tomorrow and I am making this cake for the second year in a row. She just adores it! Thank you thank you thank you. You have made me such a hero. Can’t wait to see her smile again tomorrow when she sees it!
My son loves owls so this cake will surely surprise him today for his 9th birthday! Thanks so much for the great idea!!